
Pineapple Salsa featuring Fresh and Tangy Tastes
### About the Author: Holly Nilsson
Holly Nilsson is the inventive mind behind Spend With Pennies, a site devoted to sharing simple and comforting recipes designed for daily life. With a profound enthusiasm for nostalgic tastes and easy cooking methods, Holly enables busy home cooks to craft delectable meals that are both fulfilling and dependable.
Her culinary adventure is not solely centered on cooking; it’s about crafting unforgettable moments around the dining table. Holly’s recipes frequently draw from classic comfort foods, reinterpreted to meet the demands of contemporary families. She holds the belief that cooking should be both accessible and enjoyable, which is evident in her clear-cut approach to developing recipes.
Alongside her efforts on Spend With Pennies, Holly is the author of “Everyday Comfort.” This cookbook aims to motivate readers with hearty, homemade meals that invoke warmth and reminiscence. Each recipe is crafted to be user-friendly, ensuring that even beginner cooks can whip up delightful dishes that bring happiness to their families.
For those interested in exploring more of Holly’s culinary designs, you can find her posts and recipes on her website: [See more posts by Holly](https://www.spendwithpennies.com/author/holly/).
### Follow Holly on Social Media
Stay linked with Holly and explore more of her delicious recipes by following her on social media:
– [Pinterest](https://www.pinterest.com/spendpennies/)
– [Facebook](https://www.facebook.com/ispendwithpennies/)
– [Twitter](http://spendpennies)
– [Instagram](https://www.instagram.com/spendpennies/)

Grilled Chicken Skewers with Peanut Dipping Sauce: An Easy Recipe with Striking Taste
### Chicken Satay with Creamy Coconut Curry Sauce
Tender chicken pieces marinated in a rich coconut curry sauce, skewered and grilled, paired with a zesty peanut sauce create a delicious meal that is both appetizing and fulfilling. This recipe merges the deep, fragrant flavors of coconut and curry with the crunch of peanuts, making it an ideal option for a substantial meal or a starter for social events.
#### Flavor Profile
This delectable dish showcases succulent chicken imbued with a mixture of coconut milk, soy sauce, brown sugar, garlic, and curry powder. The side peanut sauce, crafted with peanut butter, lime juice, and a touch of ginger, brings a tangy twist that complements the marinated chicken wonderfully.
#### Preparation Notes
– **Make Ahead**: You can prep the chicken satay a day before and grill it when needed, making it an efficient choice for meal preparation.
– **Time-Saving Tips**: The peanut sauce can be made up to two days in advance and kept in the fridge. For faster prep, consider using pre-cut chicken.
#### Recommended Tools
A meat thermometer is crucial to confirm the chicken reaches an internal temperature of 165°F for safe consumption.
### Ingredient Tips for Chicken Satay
– **Chicken**: Choose boneless, skinless chicken breasts sliced into strips for even cooking.
– **Marinade**: Select full-fat coconut milk for a richer taste. Discard any leftover marinade to prevent contamination.
– **Peanut Sauce**: Opt for smooth or chunky peanut butter, and modify the heat level with Sambal or sriracha to suit your palate.
### Variations
– Incorporate vegetables like red bell peppers, zucchini, or mushrooms onto the skewers for a vibrant and healthy meal.
– Swap chicken thighs for pork or shrimp for a different protein alternative.
– Utilize honey or maple syrup in place of brown sugar for a natural sweetener.
### Cooking Tips
– Cut chicken pieces evenly to ensure consistent cooking.
– Soak wooden skewers in water for at least 30 minutes to prevent them from burning on the grill.
– Strive for a slight char on the chicken to enhance flavor.
### Serving Suggestions
Present the chicken satay warm, accompanied by the spicy peanut dipping sauce. Garnish with chopped peanuts and fresh cilantro for extra flavor and visual appeal.
### Leftovers
Store any remaining chicken in a covered container in the fridge for up to four days. Reheat briefly in the microwave or air fryer. The peanut sauce can be stored for up to a week in a tightly sealed jar.
### Freezing Instructions
To freeze, remove the chicken from the skewers and place in zippered bags. It can be frozen for up to four months; thaw in the refrigerator before reheating.
### Nutritional Information (per serving)
– **Calories**: 524
– **Protein**: 46g
– **Carbohydrates**: 22g
– **Fat**: 29g
– **Sodium**: 1473mg
This chicken satay recipe is not only tasty but also adaptable, allowing for different variations to fit your flavor preferences. Savor this Asian-inspired dish as a main meal or an enticing appetizer at your next event!
Revitalizing Effervescent Lemonade Drink
Here’s a method to prepare invigorating sparkling lemonade at home using just three easy ingredients! This fizzy summer beverage is ideal for gatherings and requires only 5 minutes to whip up.
As the heat rises, I often find myself longing for something chilled, sparkling, and pleasantly tangy. That’s when I reach for this sparkling lemonade recipe! Alex and I have been refining this straightforward three-ingredient drink for years, and I can truly say it has become a family favorite during the summer.
There’s a bit of enchantment in the vibrant citrus taste paired with those charming bubbles—the ultimate combination of sweetness and tartness! I appreciate that there are no artificial flavors or high fructose corn syrup: only pure, refreshing taste.
Ingredients for sparkling lemonade
The components for homemade sparkling lemonade are straightforward: you only require 3 items to prepare a zesty glass! Here’s everything you’ll need:
– Lemons: You’ll want lemon juice squeezed from fresh lemons: skip the bottled lemon juice! For one serving, use 1 large or 2 small lemons.
– Simple syrup: Simple syrup is a breeze to create at home using sugar and water. Prepare a batch and keep it in the fridge for your lemonade or cocktail needs.
– Soda water: You can purchase your own sparkling water or club soda, or create your own using a Soda Stream (my preferred choice!).
Make it by the glass or in a pitcher
Once your ingredients are ready, simply combine them! The main way I enjoy making it is by the glass, as you get fresh fizziness directly in your cup. However, if you’re hosting and wish to serve a group, going with a pitcher is also an option!
– By the glass: The recipe below yields 10 ounces or 1 ½ cups of sparkling lemonade—perfect for on-demand enjoyment.
– Pitcher: For gatherings, prepare a pitcher that provides 8 servings of 1 cup each. Note that leftovers won’t last well due to the sparkling water.
My favorite techniques for juicing lemons
After crafting hundreds of lemonade glasses, I’ve discovered the most effective ways to extract maximum juice:
– Best tool: A press juicer is my first choice. It yields more juice than any other method I’ve encountered and keeps seeds contained.
– Second choice: A handheld citrus reamer with ridges functions effectively and requires no special tools.
If you plan to hand squeeze, a helpful tip is to slice lemons in half crosswise (not lengthwise) and squeeze over a fine-mesh strainer to catch seeds. This is certainly more labor-intensive, so opt for a press juicer if possible!
Elevate it with clear ice
Want a stylish glass of sparkling lemonade that resembles the one in the pictures? Prepare a batch of clear ice! Clear ice is homemade ice that’s crystal clear, unlike the typical cloudy ice.
You can cut it into large, naturally shaped cubes, resembling ice from an upscale bar or restaurant. We utilize clear ice in many of our cocktail recipes: and it works well for sparkling lemonade too.
Cocktails that incorporate sparkling lemonade
You can blend this homemade sparkling lemonade into cocktail recipes, offering a wonderfully bright citrus flavor. In fact, Alex and I initially created this recipe while crafting a Summer Shandy.
– Summer Shandy: A shandy is a British beer cocktail that combines beer and sparkling lemonade or ginger ale. Also consider a Classic Shandy.
– Pimm’s Cup: This British cocktail is refreshing and bubbly, featuring Pimm’s No. 1 and sparkling lemonade. It’s ideal for summer (and often enjoyed at Wimbledon, if you’re a tennis enthusiast like I am.)
Additional refreshing summer beverages
If this sparkling lemonade tantalizes your taste buds, give these other refreshing drinks a try:
You can also incorporate soda water into these beverages to convert them into sparkling lemonade! There’s something incredibly satisfying about crafting a simple, delightful drink from scratch that brings people together: share your thoughts in the comments below.
Dietary notes
This sparkling lemonade recipe is vegetarian, vegan, plant-based, dairy-free and gluten-free.
Homemade Sparkling Lemonade
Here’s a method to prepare invigorating sparkling lemonade at home using just three easy ingredients! This fizzy summer beverage is ideal for gatherings and requires only 5 minutes to whip up.
Author: Sonja Overhiser
Prep Time: 5 minutes
Cook Time: 0 minutes
Total Time: 5 minutes
Yield: 1 drink
Category: Drink
Method: Stirred
Cuisine: American
Diet: Vegan
Ingredients
– 2 ounces (¼ cup) simple syrup
– 2 ounces (¼ cup) fresh lemon juice (1 large or 2 small lemons)
– 8 ounces (1 cup) soda water
Instructions
1. Single glass: In the serving glass, stir the simple syrup and lemon juice. Add ice and top with
Protein-Enhanced Cacio e Pepe Recipe
**Protein-Packed Cacio e Pepe Recipe: A Healthy Take on a Timeless Dish**
Cacio e Pepe, the iconic Roman pasta creation, is celebrated for its straightforwardness and robust flavors. Typically crafted using only three components—pasta, Pecorino Romano cheese, and black pepper—this dish exemplifies the elegance of straightforward Italian cuisine. However, for those wanting to increase their protein level, a few tweaks can turn this classic into a protein-packed delight without compromising its genuine flavor.
**Ingredients:**
– 200g whole wheat spaghetti or protein-fortified pasta
– 100g Pecorino Romano cheese, finely shredded
– 1 tablespoon freshly crushed black pepper
– 100g grilled chicken breast, cubed
– 50g chickpea flour
– 2 tablespoons olive oil
– Salt, to taste
**Instructions:**
1. **Cook the Pasta:**
– Fill a large pot with salted water and bring it to a boil. Add the whole wheat or protein-fortified pasta and cook until al dente, according to the package directions. Set aside about 1 cup of pasta water before draining.
2. **Boost the Protein:**
– While the pasta is boiling, warm olive oil in a large skillet over medium heat. Incorporate the chickpea flour and stir continuously for approximately 2-3 minutes until it turns a golden hue. This process not only elevates the protein content but adds a pleasant nuttiness to the dish.
3. **Prepare the Sauce:**
– Slowly pour the reserved pasta water into the skillet with chickpea flour, stirring constantly to develop a smooth, creamy sauce. Add more water if needed to reach the preferred texture.
4. **Mix in Cheese and Pepper:**
– Lower the heat and mix in the grated Pecorino Romano cheese and freshly ground black pepper into the sauce. Stir until the cheese melts and the sauce becomes velvety. Season with salt if necessary.
5. **Mix and Serve:**
– Add the cooked pasta and cubed grilled chicken breast into the skillet. Toss everything together until the pasta is thoroughly coated with the sauce and the chicken is evenly mixed in.
6. **Garnish and Enjoy:**
– Serve right away, topped with extra Pecorino Romano and a dash of black pepper for an added punch.
**Nutritional Advantages:**
This protein-packed rendition of Cacio e Pepe provides numerous nutritional benefits. Whole wheat or protein-fortified pasta delivers increased fiber and protein compared to standard pasta, enhancing digestion and muscle recovery. Chickpea flour is a wonderful source of plant-based protein that contributes a delicate nuttiness. Grilled chicken breast is a lean protein that complements the dish’s flavors without overshadowing its traditional essence. Collectively, these ingredients form a balanced meal that promotes muscle growth and overall wellness.
**Final Thoughts:**
By incorporating protein-rich components into the classic Cacio e Pepe, you can savor a delightful, healthful meal that fulfills both your cravings and nutritional requirements. This recipe preserves the core of the original dish while presenting a contemporary twist that appeals to those in search of more protein. Whether you’re an athlete, a fitness lover, or simply an admirer of Italian fare, this protein-packed Cacio e Pepe is bound to become a cherished addition to your cooking collection.

Recipes for an Extended Weekend Summer Getaway
# A Definitive Manual for Summer Getaway Extended Weekend Dishes
The initial summer break is nearly upon us, and what better way to rejoice than with an abundance of delectable cuisine! When the climate is pleasant, resisting the call to the outdoors is a challenge. Whether you’re barbecuing, enjoying a picnic, or simply relishing a meal in your garden, you’ll desire some scrumptious recipes. Here’s a manual for quick, simple, hassle-free, and flavorful summer dishes that will ensure your extended weekend is unforgettable.
## Grilled Main Courses
### 1. Traditional Burgers
– **Ingredients**: Ground beef, salt, pepper, cheese slices, burger buns, lettuce, tomato, onion, pickles.
– **Instructions**: Shape patties, season with salt and pepper, grill to preferred doneness, add cheese, and serve on buns with toppings.
### 2. BBQ Chicken
– **Ingredients**: Chicken pieces, BBQ sauce, salt, pepper.
– **Instructions**: Season chicken, grill until fully cooked, brush with BBQ sauce, and grill for a few additional minutes.
### 3. Fish Tacos on the Grill
– **Ingredients**: White fish fillets, taco seasoning, corn tortillas, cabbage slaw, lime wedges.
– **Instructions**: Season fish, grill until flaky, serve in tortillas with slaw and lime.
### 4. Smoked Ribs
– **Ingredients**: Pork ribs, dry rub, BBQ sauce.
– **Instructions**: Apply dry rub, smoke ribs until tender, finish with BBQ sauce.
## Accompaniments
### 1. Coleslaw
– **Ingredients**: Cabbage, carrots, mayonnaise, vinegar, sugar, salt, pepper.
– **Instructions**: Shred cabbage and carrots, combine with remaining ingredients, chill before serving.
### 2. Grilled Corn on the Cob
– **Ingredients**: Corn, butter, salt, pepper.
– **Instructions**: Grill corn until charred, coat with butter, season with salt and pepper.
### 3. Caprese Salad
– **Ingredients**: Tomatoes, mozzarella, basil, olive oil, balsamic glaze.
– **Instructions**: Layer tomatoes and mozzarella, sprinkle with basil, drizzle with olive oil and balsamic glaze.
### 4. Potato Salad
– **Ingredients**: Potatoes, mayonnaise, mustard, celery, onion, salt, pepper.
– **Instructions**: Boil potatoes, combine with remaining ingredients, chill before serving.
## Sweets
### 1. Berry Parfait
– **Ingredients**: Mixed berries, yogurt, granola.
– **Instructions**: Layer berries, yogurt, and granola in a glass.
### 2. Grilled Peaches
– **Ingredients**: Peaches, honey, cinnamon.
– **Instructions**: Halve peaches, grill until soft, drizzle with honey and sprinkle with cinnamon.
### 3. Ice Cream Sandwiches
– **Ingredients**: Cookies, ice cream.
– **Instructions**: Put a scoop of ice cream between two cookies, freeze until solid.
## Refreshments
### 1. Lemonade
– **Ingredients**: Lemons, sugar, water.
– **Instructions**: Squeeze lemons, combine with sugar and water, chill before serving.
### 2. Iced Tea
– **Ingredients**: Tea bags, sugar, lemon slices.
– **Instructions**: Brew tea, add sugar, chill, serve with lemon slices.
### 3. Fruit Punch
– **Ingredients**: Mixed fruit juices, soda water, fresh fruit slices.
– **Instructions**: Combine juices, add soda water, garnish with fruit slices.
No matter your plans for the holiday, ensure it is abundant with delectable food! Savor the sunshine and delightful tastes of summer with these simple and hassle-free recipes.
Pineapple Salsa featuring Fresh and Tangy Tastes
### About the Author: Holly Nilsson
Holly Nilsson is the inventive mind behind Spend With Pennies, a site devoted to sharing simple and comforting recipes designed for daily life. With a profound enthusiasm for nostalgic tastes and easy cooking methods, Holly enables busy home cooks to craft delectable meals that are both fulfilling and dependable.
Her culinary adventure is not solely centered on cooking; it’s about crafting unforgettable moments around the dining table. Holly’s recipes frequently draw from classic comfort foods, reinterpreted to meet the demands of contemporary families. She holds the belief that cooking should be both accessible and enjoyable, which is evident in her clear-cut approach to developing recipes.
Alongside her efforts on Spend With Pennies, Holly is the author of “Everyday Comfort.” This cookbook aims to motivate readers with hearty, homemade meals that invoke warmth and reminiscence. Each recipe is crafted to be user-friendly, ensuring that even beginner cooks can whip up delightful dishes that bring happiness to their families.
For those interested in exploring more of Holly’s culinary designs, you can find her posts and recipes on her website: [See more posts by Holly](https://www.spendwithpennies.com/author/holly/).
### Follow Holly on Social Media
Stay linked with Holly and explore more of her delicious recipes by following her on social media:
– [Pinterest](https://www.pinterest.com/spendpennies/)
– [Facebook](https://www.facebook.com/ispendwithpennies/)
– [Twitter](http://spendpennies)
– [Instagram](https://www.instagram.com/spendpennies/)

Grilled Chicken Skewers with Peanut Dipping Sauce: An Easy Recipe with Striking Taste
### Chicken Satay with Creamy Coconut Curry Sauce
Tender chicken pieces marinated in a rich coconut curry sauce, skewered and grilled, paired with a zesty peanut sauce create a delicious meal that is both appetizing and fulfilling. This recipe merges the deep, fragrant flavors of coconut and curry with the crunch of peanuts, making it an ideal option for a substantial meal or a starter for social events.
#### Flavor Profile
This delectable dish showcases succulent chicken imbued with a mixture of coconut milk, soy sauce, brown sugar, garlic, and curry powder. The side peanut sauce, crafted with peanut butter, lime juice, and a touch of ginger, brings a tangy twist that complements the marinated chicken wonderfully.
#### Preparation Notes
– **Make Ahead**: You can prep the chicken satay a day before and grill it when needed, making it an efficient choice for meal preparation.
– **Time-Saving Tips**: The peanut sauce can be made up to two days in advance and kept in the fridge. For faster prep, consider using pre-cut chicken.
#### Recommended Tools
A meat thermometer is crucial to confirm the chicken reaches an internal temperature of 165°F for safe consumption.
### Ingredient Tips for Chicken Satay
– **Chicken**: Choose boneless, skinless chicken breasts sliced into strips for even cooking.
– **Marinade**: Select full-fat coconut milk for a richer taste. Discard any leftover marinade to prevent contamination.
– **Peanut Sauce**: Opt for smooth or chunky peanut butter, and modify the heat level with Sambal or sriracha to suit your palate.
### Variations
– Incorporate vegetables like red bell peppers, zucchini, or mushrooms onto the skewers for a vibrant and healthy meal.
– Swap chicken thighs for pork or shrimp for a different protein alternative.
– Utilize honey or maple syrup in place of brown sugar for a natural sweetener.
### Cooking Tips
– Cut chicken pieces evenly to ensure consistent cooking.
– Soak wooden skewers in water for at least 30 minutes to prevent them from burning on the grill.
– Strive for a slight char on the chicken to enhance flavor.
### Serving Suggestions
Present the chicken satay warm, accompanied by the spicy peanut dipping sauce. Garnish with chopped peanuts and fresh cilantro for extra flavor and visual appeal.
### Leftovers
Store any remaining chicken in a covered container in the fridge for up to four days. Reheat briefly in the microwave or air fryer. The peanut sauce can be stored for up to a week in a tightly sealed jar.
### Freezing Instructions
To freeze, remove the chicken from the skewers and place in zippered bags. It can be frozen for up to four months; thaw in the refrigerator before reheating.
### Nutritional Information (per serving)
– **Calories**: 524
– **Protein**: 46g
– **Carbohydrates**: 22g
– **Fat**: 29g
– **Sodium**: 1473mg
This chicken satay recipe is not only tasty but also adaptable, allowing for different variations to fit your flavor preferences. Savor this Asian-inspired dish as a main meal or an enticing appetizer at your next event!
Read More
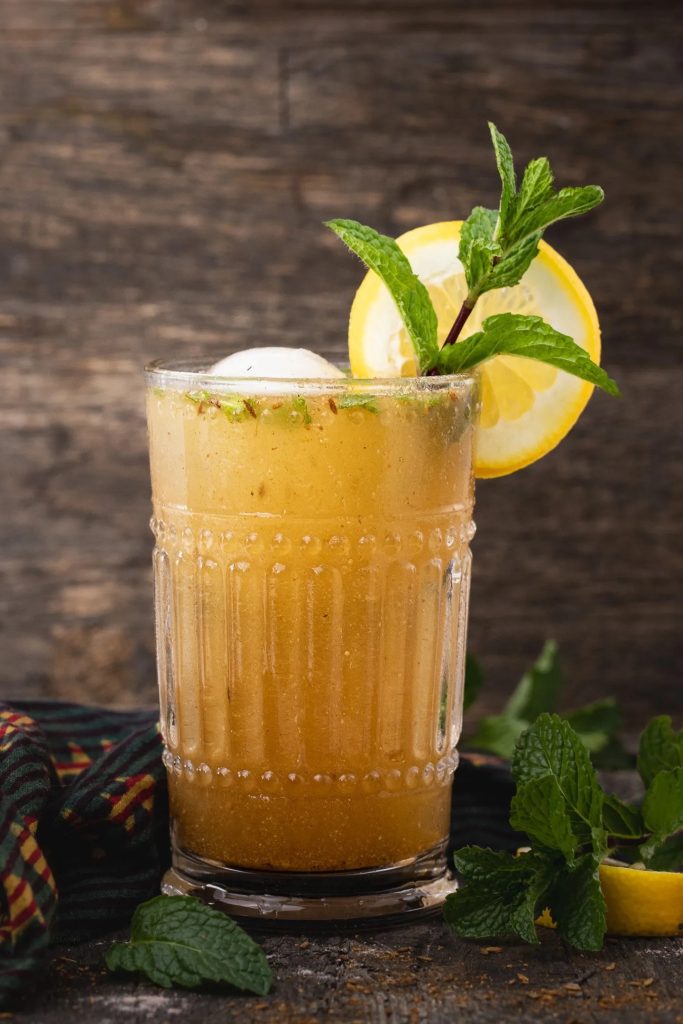
Revitalizing Effervescent Lemonade Drink
Here’s a method to prepare invigorating sparkling lemonade at home using just three easy ingredients! This fizzy summer beverage is ideal for gatherings and requires only 5 minutes to whip up.
As the heat rises, I often find myself longing for something chilled, sparkling, and pleasantly tangy. That’s when I reach for this sparkling lemonade recipe! Alex and I have been refining this straightforward three-ingredient drink for years, and I can truly say it has become a family favorite during the summer.
There’s a bit of enchantment in the vibrant citrus taste paired with those charming bubbles—the ultimate combination of sweetness and tartness! I appreciate that there are no artificial flavors or high fructose corn syrup: only pure, refreshing taste.
Ingredients for sparkling lemonade
The components for homemade sparkling lemonade are straightforward: you only require 3 items to prepare a zesty glass! Here’s everything you’ll need:
– Lemons: You’ll want lemon juice squeezed from fresh lemons: skip the bottled lemon juice! For one serving, use 1 large or 2 small lemons.
– Simple syrup: Simple syrup is a breeze to create at home using sugar and water. Prepare a batch and keep it in the fridge for your lemonade or cocktail needs.
– Soda water: You can purchase your own sparkling water or club soda, or create your own using a Soda Stream (my preferred choice!).
Make it by the glass or in a pitcher
Once your ingredients are ready, simply combine them! The main way I enjoy making it is by the glass, as you get fresh fizziness directly in your cup. However, if you’re hosting and wish to serve a group, going with a pitcher is also an option!
– By the glass: The recipe below yields 10 ounces or 1 ½ cups of sparkling lemonade—perfect for on-demand enjoyment.
– Pitcher: For gatherings, prepare a pitcher that provides 8 servings of 1 cup each. Note that leftovers won’t last well due to the sparkling water.
My favorite techniques for juicing lemons
After crafting hundreds of lemonade glasses, I’ve discovered the most effective ways to extract maximum juice:
– Best tool: A press juicer is my first choice. It yields more juice than any other method I’ve encountered and keeps seeds contained.
– Second choice: A handheld citrus reamer with ridges functions effectively and requires no special tools.
If you plan to hand squeeze, a helpful tip is to slice lemons in half crosswise (not lengthwise) and squeeze over a fine-mesh strainer to catch seeds. This is certainly more labor-intensive, so opt for a press juicer if possible!
Elevate it with clear ice
Want a stylish glass of sparkling lemonade that resembles the one in the pictures? Prepare a batch of clear ice! Clear ice is homemade ice that’s crystal clear, unlike the typical cloudy ice.
You can cut it into large, naturally shaped cubes, resembling ice from an upscale bar or restaurant. We utilize clear ice in many of our cocktail recipes: and it works well for sparkling lemonade too.
Cocktails that incorporate sparkling lemonade
You can blend this homemade sparkling lemonade into cocktail recipes, offering a wonderfully bright citrus flavor. In fact, Alex and I initially created this recipe while crafting a Summer Shandy.
– Summer Shandy: A shandy is a British beer cocktail that combines beer and sparkling lemonade or ginger ale. Also consider a Classic Shandy.
– Pimm’s Cup: This British cocktail is refreshing and bubbly, featuring Pimm’s No. 1 and sparkling lemonade. It’s ideal for summer (and often enjoyed at Wimbledon, if you’re a tennis enthusiast like I am.)
Additional refreshing summer beverages
If this sparkling lemonade tantalizes your taste buds, give these other refreshing drinks a try:
You can also incorporate soda water into these beverages to convert them into sparkling lemonade! There’s something incredibly satisfying about crafting a simple, delightful drink from scratch that brings people together: share your thoughts in the comments below.
Dietary notes
This sparkling lemonade recipe is vegetarian, vegan, plant-based, dairy-free and gluten-free.
Homemade Sparkling Lemonade
Here’s a method to prepare invigorating sparkling lemonade at home using just three easy ingredients! This fizzy summer beverage is ideal for gatherings and requires only 5 minutes to whip up.
Author: Sonja Overhiser
Prep Time: 5 minutes
Cook Time: 0 minutes
Total Time: 5 minutes
Yield: 1 drink
Category: Drink
Method: Stirred
Cuisine: American
Diet: Vegan
Ingredients
– 2 ounces (¼ cup) simple syrup
– 2 ounces (¼ cup) fresh lemon juice (1 large or 2 small lemons)
– 8 ounces (1 cup) soda water
Instructions
1. Single glass: In the serving glass, stir the simple syrup and lemon juice. Add ice and top with
Read More
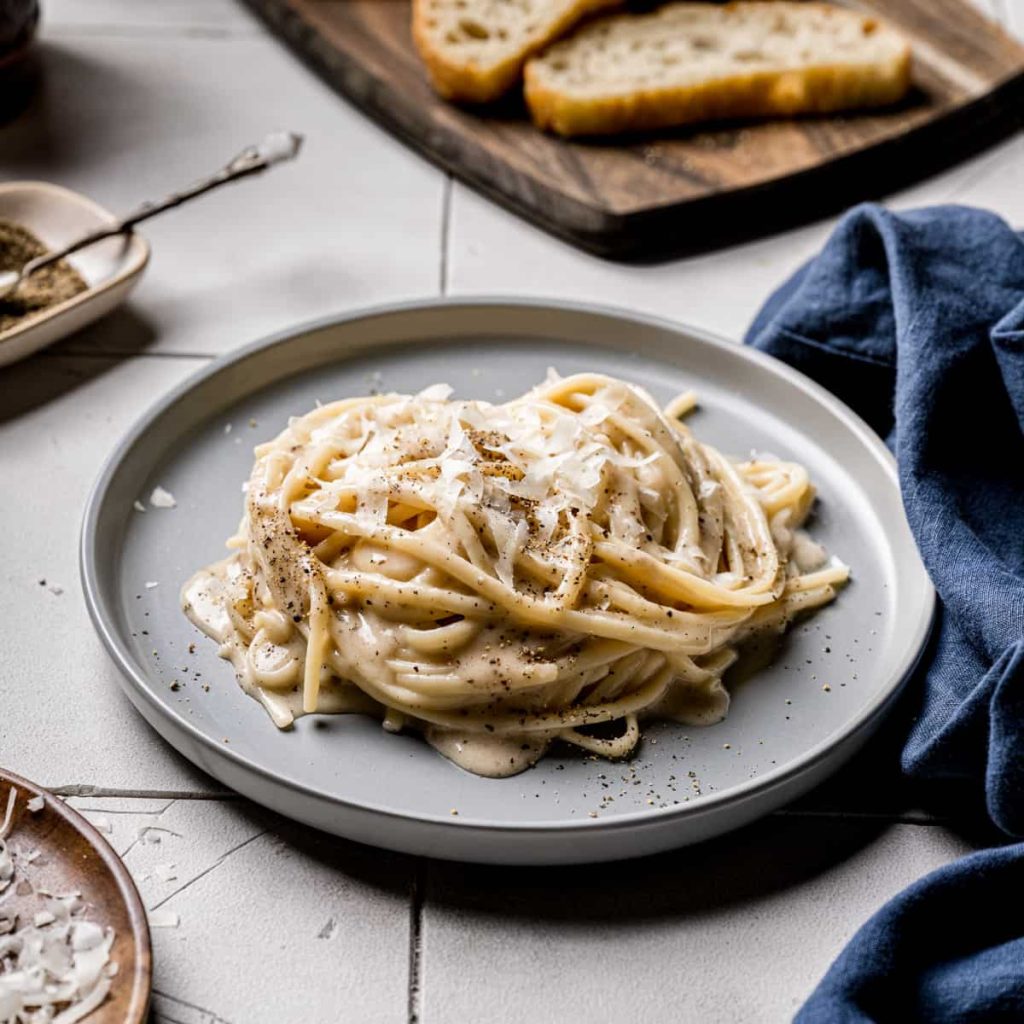
Protein-Enhanced Cacio e Pepe Recipe
**Protein-Packed Cacio e Pepe Recipe: A Healthy Take on a Timeless Dish**
Cacio e Pepe, the iconic Roman pasta creation, is celebrated for its straightforwardness and robust flavors. Typically crafted using only three components—pasta, Pecorino Romano cheese, and black pepper—this dish exemplifies the elegance of straightforward Italian cuisine. However, for those wanting to increase their protein level, a few tweaks can turn this classic into a protein-packed delight without compromising its genuine flavor.
**Ingredients:**
– 200g whole wheat spaghetti or protein-fortified pasta
– 100g Pecorino Romano cheese, finely shredded
– 1 tablespoon freshly crushed black pepper
– 100g grilled chicken breast, cubed
– 50g chickpea flour
– 2 tablespoons olive oil
– Salt, to taste
**Instructions:**
1. **Cook the Pasta:**
– Fill a large pot with salted water and bring it to a boil. Add the whole wheat or protein-fortified pasta and cook until al dente, according to the package directions. Set aside about 1 cup of pasta water before draining.
2. **Boost the Protein:**
– While the pasta is boiling, warm olive oil in a large skillet over medium heat. Incorporate the chickpea flour and stir continuously for approximately 2-3 minutes until it turns a golden hue. This process not only elevates the protein content but adds a pleasant nuttiness to the dish.
3. **Prepare the Sauce:**
– Slowly pour the reserved pasta water into the skillet with chickpea flour, stirring constantly to develop a smooth, creamy sauce. Add more water if needed to reach the preferred texture.
4. **Mix in Cheese and Pepper:**
– Lower the heat and mix in the grated Pecorino Romano cheese and freshly ground black pepper into the sauce. Stir until the cheese melts and the sauce becomes velvety. Season with salt if necessary.
5. **Mix and Serve:**
– Add the cooked pasta and cubed grilled chicken breast into the skillet. Toss everything together until the pasta is thoroughly coated with the sauce and the chicken is evenly mixed in.
6. **Garnish and Enjoy:**
– Serve right away, topped with extra Pecorino Romano and a dash of black pepper for an added punch.
**Nutritional Advantages:**
This protein-packed rendition of Cacio e Pepe provides numerous nutritional benefits. Whole wheat or protein-fortified pasta delivers increased fiber and protein compared to standard pasta, enhancing digestion and muscle recovery. Chickpea flour is a wonderful source of plant-based protein that contributes a delicate nuttiness. Grilled chicken breast is a lean protein that complements the dish’s flavors without overshadowing its traditional essence. Collectively, these ingredients form a balanced meal that promotes muscle growth and overall wellness.
**Final Thoughts:**
By incorporating protein-rich components into the classic Cacio e Pepe, you can savor a delightful, healthful meal that fulfills both your cravings and nutritional requirements. This recipe preserves the core of the original dish while presenting a contemporary twist that appeals to those in search of more protein. Whether you’re an athlete, a fitness lover, or simply an admirer of Italian fare, this protein-packed Cacio e Pepe is bound to become a cherished addition to your cooking collection.
Read More
Recipes for an Extended Weekend Summer Getaway
# A Definitive Manual for Summer Getaway Extended Weekend Dishes
The initial summer break is nearly upon us, and what better way to rejoice than with an abundance of delectable cuisine! When the climate is pleasant, resisting the call to the outdoors is a challenge. Whether you’re barbecuing, enjoying a picnic, or simply relishing a meal in your garden, you’ll desire some scrumptious recipes. Here’s a manual for quick, simple, hassle-free, and flavorful summer dishes that will ensure your extended weekend is unforgettable.
## Grilled Main Courses
### 1. Traditional Burgers
– **Ingredients**: Ground beef, salt, pepper, cheese slices, burger buns, lettuce, tomato, onion, pickles.
– **Instructions**: Shape patties, season with salt and pepper, grill to preferred doneness, add cheese, and serve on buns with toppings.
### 2. BBQ Chicken
– **Ingredients**: Chicken pieces, BBQ sauce, salt, pepper.
– **Instructions**: Season chicken, grill until fully cooked, brush with BBQ sauce, and grill for a few additional minutes.
### 3. Fish Tacos on the Grill
– **Ingredients**: White fish fillets, taco seasoning, corn tortillas, cabbage slaw, lime wedges.
– **Instructions**: Season fish, grill until flaky, serve in tortillas with slaw and lime.
### 4. Smoked Ribs
– **Ingredients**: Pork ribs, dry rub, BBQ sauce.
– **Instructions**: Apply dry rub, smoke ribs until tender, finish with BBQ sauce.
## Accompaniments
### 1. Coleslaw
– **Ingredients**: Cabbage, carrots, mayonnaise, vinegar, sugar, salt, pepper.
– **Instructions**: Shred cabbage and carrots, combine with remaining ingredients, chill before serving.
### 2. Grilled Corn on the Cob
– **Ingredients**: Corn, butter, salt, pepper.
– **Instructions**: Grill corn until charred, coat with butter, season with salt and pepper.
### 3. Caprese Salad
– **Ingredients**: Tomatoes, mozzarella, basil, olive oil, balsamic glaze.
– **Instructions**: Layer tomatoes and mozzarella, sprinkle with basil, drizzle with olive oil and balsamic glaze.
### 4. Potato Salad
– **Ingredients**: Potatoes, mayonnaise, mustard, celery, onion, salt, pepper.
– **Instructions**: Boil potatoes, combine with remaining ingredients, chill before serving.
## Sweets
### 1. Berry Parfait
– **Ingredients**: Mixed berries, yogurt, granola.
– **Instructions**: Layer berries, yogurt, and granola in a glass.
### 2. Grilled Peaches
– **Ingredients**: Peaches, honey, cinnamon.
– **Instructions**: Halve peaches, grill until soft, drizzle with honey and sprinkle with cinnamon.
### 3. Ice Cream Sandwiches
– **Ingredients**: Cookies, ice cream.
– **Instructions**: Put a scoop of ice cream between two cookies, freeze until solid.
## Refreshments
### 1. Lemonade
– **Ingredients**: Lemons, sugar, water.
– **Instructions**: Squeeze lemons, combine with sugar and water, chill before serving.
### 2. Iced Tea
– **Ingredients**: Tea bags, sugar, lemon slices.
– **Instructions**: Brew tea, add sugar, chill, serve with lemon slices.
### 3. Fruit Punch
– **Ingredients**: Mixed fruit juices, soda water, fresh fruit slices.
– **Instructions**: Combine juices, add soda water, garnish with fruit slices.
No matter your plans for the holiday, ensure it is abundant with delectable food! Savor the sunshine and delightful tastes of summer with these simple and hassle-free recipes.
Read More
Straightforward Instructions for Preparing Marinated Tofu
This simple marinated tofu recipe requires no cooking and offers amazing umami flavor with minimal effort! Seasoned with soy sauce, sesame oil, and ginger, it’s ideal for meal prepping and nutritious weeknight dinners.
I have to confess—I wasn’t always a fan of tofu. But then I found this revolutionary marinated tofu (and a few other straightforward tofu recipes) that completely changed my perception of this plant-based protein!
This marinated tofu is loaded with rich umami flavors from toasted sesame oil, fresh ginger, garlic, and soy sauce, along with green onions and sesame seeds for added texture and freshness. The best part? Cooking isn’t even necessary! Simply press, marinate, and savor. It’s become one of my go-to meal prep essentials! Toss it in a bowl with rice, soba noodles, or quinoa along with some fresh vegetables, and you’ve got an instant nutritious lunch or dinner!
How to create this effortless marinated tofu recipe
Alex and I actually got inspired to make this marinated tofu recipe from a dinner we had at the Chicago Midway airport. Wait: an airport? Yes, I can confidently say this is the first and only recipe on this website that has been inspired by airport food!
So, we were at Chicago Midway and needed a quick healthy dinner. Miraculously, Alex stumbled upon some sushi and a box of marinated tofu. After the first bite, we couldn’t stop eating it! It was incredibly savory and fulfilling while still tasting fresh and healthy.
This marinated tofu is the essence of simplicity: there are essentially two steps. Press, then marinate. Tofu contains quite a bit of water, so to infuse it with flavor, you must press it. However, we’ve devised a quick method to do just that!
A quick tip for pressing tofu
Many tofu recipes require pressing the tofu for about an hour to remove the excess water before starting the recipe. This can be a hassle on a weeknight, so I researched quicker methods for extracting the water from tofu. Surprisingly, there’s an effective trick using the microwave!
If you microwave tofu for 2 minutes, it releases a considerable amount of liquid. Then place the pieces on a dry towel, put a cutting board on top, and add a heavy object. The weight will draw out more water, and it will be finished in just 15 minutes.
How to marinate tofu
After pressing the tofu, all that’s left is to marinate it for 30 minutes. Simply let it rest in a bowl with the marinade. The flavors are a delightful balance of savory, sweet, tangy, and spicy: soy sauce, garlic and sesame oil, zesty rice vinegar, maple syrup, and a hint of gochujang hot sauce for a touch of heat.
Combine those ingredients with some minced green onion and sesame seeds, and it’s so tasty, you won’t believe it. When we first offered this marinated tofu to our 2-year-old, it disappeared in an instant!
No cooking needed (but feel free to if you want)
With this effortless marinated tofu, cooking isn’t necessary. This makes it 100% easier than any baked version. Since it’s firm tofu and you’ve pressed out all the water, the tofu has a fantastic texture.
Of course, you can cook it if you choose! You can pan-fry it or create baked tofu. But this straightforward marinated tofu recipe really doesn’t require cooking: it’s packed with flavor without any hassle.
Is tofu nutritious?
Absolutely! Tofu is a key part of a healthy diet. According to Harvard, soy is a nutrient-rich protein source that can be safely consumed several times a week. It’s likely to offer health benefits—especially when enjoyed as an alternative to red and processed meats.
Serving ideas for marinated tofu
This marinated tofu is so easy as it requires very little hands-on time: there’s really only about 10 minutes of active prep. This allows you plenty of time to prepare the rest of your meal. Since it can be stored in the fridge for up to 5 days, it’s ideal for lunches! How do we serve this marinated tofu? Here are some suggestions:
Lunch bowls: I love combining this tofu with seasoned quinoa and sautéed broccoli for a protein-rich lunch. Add some tahini dressing to tie it all together.
Noodles for dinner: Serve it alongside peanut noodles or quick soba noodles with steamed veggies.
Grain bowls: Layer it over brown rice with easy edamame and fresh vegetables. I often include sliced cucumber and shredded carrots.
Stir fry boost: Add it to fried rice or cauliflower fried rice during the last minute of cooking for an extra protein boost without additional cooking time.
Healthy snacking: Enjoy it straight with chopsticks—it’s that delicious! It’s perfect for office lunches with
Read More
30 Tasty Vegetarian Dish Recipes
Alex & Sonja: The Culinary Team Behind A Couple Cooks
Introducing Alex and Sonja Overhiser, the talented pair responsible for the beloved food blog, A Couple Cooks. This real-life couple has been showcasing their love for cooking since 2010, providing a wealth of uncomplicated, seasonal recipes that motivate home chefs across the globe. As busy parents and authors of two celebrated cookbooks, Alex and Sonja excel at harmonizing family life with their culinary pursuits.
Their adventure commenced with a common passion for food and an aspiration to unite people through cooking. Over time, A Couple Cooks has transformed into a thorough resource for anyone aiming to elevate their kitchen abilities. The blog boasts thousands of unique recipes, each carefully designed and captured by Alex and Sonja themselves. From swift weeknight meals to intricate festive banquets, their recipes appeal to a diverse spectrum of tastes and dietary needs.
What distinguishes Alex and Sonja is their dedication to utilizing seasonal produce and advocating sustainable cooking habits. They hold the belief that cooking with fresh, locally-sourced ingredients not only intensifies the taste of dishes but also fosters a healthier lifestyle and environment. Their recipes often showcase the natural elegance and flavor of vegetables, making them a favorite among those following vegetarian and vegan diets.
In addition to recipes, A Couple Cooks provides useful cooking tips and meal planning suggestions, assisting readers in optimizing their kitchen practices. Alex and Sonja recognize the difficulties of balancing work, family, and meal prep, and they strive to make cooking a pleasurable and hassle-free activity for all.
Through their blog, cookbooks, and social media engagement, Alex and Sonja have cultivated a lively community of food lovers who share in their passion for cooking. Their approachable demeanor and authentic enthusiasm for food have garnered them a dedicated following, and they continue to motivate others to uncover the joy of cooking together.
Regardless of whether you’re an experienced chef or a culinary beginner, Alex and Sonja’s A Couple Cooks serves as a premier source for delightful recipes and culinary inspiration. Join them on their adventure and experience the enchantment of cooking with affection and creativity.
Read More
Reuben-Style Pasta Salad with Corned Beef and Sauerkraut
Reuben Pasta Salad
Prep Time: 15 minutes Cook Time: 15 minutes Total Time: 30 minutes Servings: 12
A delicious pasta salad infused with the flavors of reuben sandwiches!
ingredients
directions
- Prepare the pasta according to the package instructions, then drain and rinse under cold water until it is cooled.
- Combine the pasta, corned beef, sauerkraut, Swiss cheese, and dill pickle.
- Toss the salad with the dressing and enjoy!
Option: Incorporate 1 tablespoon sauerkraut brine.
Option: Incorporate 1 tablespoon pickle brine.
Quinoa-Powered Tabbouleh Salad Recipe
**Quinoa Tabbouleh: A Gluten-Free Variation on a Classic**
For tabbouleh fans, have you thought about substituting quinoa for bulgur wheat? This creative recipe turns the cherished Lebanese salad into a gluten-free treat. Quinoa, known for its airy texture and mildly nutty taste, blends perfectly into the dish, preserving the spirit of classic tabbouleh.
**Ingredients and Optional Additions**
Although quinoa is the main replacement, don’t hesitate to try adding ingredients like chickpeas and feta cheese. These extra elements enhance the dish’s heartiness, making it substantial enough to serve as a light meal.
**Refreshing and Herbaceous**
This colorful salad is ideal for sunny days, incorporating fresh parsley, mint, tomato, cucumber, olive oil, lemon juice, and garlic. The ratios respect the traditional recipe, ensuring parsley shines as the main ingredient, accentuated by a lively lemon flavor.
**Recipe Tips & Tricks**
1. **Perfect Quinoa**: Utilize a dependable quinoa cooking technique for optimal fluffiness.
2. **Flavor Concentration**: Salt and drain tomatoes and cucumbers to elevate their taste and avoid excess moisture in the salad.
3. **Parsley Preparation**: Use a generous amount of parsley, finely chopping it for the best texture and flavor.
4. **Seasoning**: Use ample lemon juice and salt to create a zesty, flavorful salad.
**Serving Suggestions**
This quinoa tabbouleh complements a variety of gluten-free choices, enhancing its flexibility for different dietary needs.
**Recipe Instructions**
1. Rinse quinoa and cook until all water is absorbed. Allow it to steam, then fluff using a fork.
2. Salt the tomatoes and cucumbers and let them sit before draining the extra juice.
3. Finely chop parsley, using a food processor if you have one.
4. In a bowl, combine the cooled quinoa, mint, green onion, and drained vegetables.
5. Mix olive oil, lemon juice, garlic, and salt, and then incorporate it into the salad. Include chickpeas or feta if you wish.
6. Let the salad sit to allow the flavors to combine or serve right away. It can be stored in the fridge for up to four days.
**Notes**
– To make a dairy-free or vegan version, exclude feta cheese.
– Nutritional information is approximate and should not substitute professional guidance.
Savor your gluten-free quinoa tabbouleh, and don’t hesitate to share your thoughts in the comments!
Read More
Macaroni and Cheese Recipe by Tini
# Tini’s Mac and Cheese Sensation: A Decadent and Tasty Treat
Tini’s mac and cheese has gone viral on the internet, garnering over 60 million views on TikTok. This rich and cheesy dish is essential for any mac and cheese lover. Featuring three varieties of cheese and corkscrew pasta, it’s a pairing that is destined to delight. Ideal for potlucks, barbecues, or family reunions, this recipe is bound to impress.
## What is Tini’s Mac and Cheese?
Tini’s mac and cheese surged in popularity when it was showcased on TikTok, enchanting viewers with its deep flavors and velvety texture. It has become a go-to for many during holiday festivities, particularly Thanksgiving. If you’re looking to elevate your mac and cheese experience, this recipe is an excellent option.
## Ingredients for Tini’s Mac and Cheese
To recreate Tini’s scrumptious mac and cheese, you will require these ingredients:
– **Pasta**: 1 lb of corkscrew pasta (cavatappi) is favored for its ability to trap the creamy sauce.
– **Cheese**:
– 1 lb mozzarella cheese
– 1 lb colby jack cheese
– ½ lb sharp cheddar cheese
– **Butter**: 3 tablespoons of unsalted butter for making the roux.
– **Flour**: 3 tablespoons of all-purpose flour for creating the roux.
– **Evaporated Milk**: 12 oz (1 can) for added creaminess.
– **Heavy Cream**: 2 cups to enhance the richness.
– **Seasonings**:
– ¼ tsp salt
– ¼ tsp freshly ground pepper
– ½ tsp garlic powder
– ½ tsp smoked paprika
– **Dijon Mustard**: 1 tablespoon to offset the richness of the cheese.
## How to Prepare Tini’s Mac and Cheese
1. **Cook the Pasta**: In a large pot of salted boiling water, cook the pasta per package directions. Drain thoroughly.
2. **Prepare the Roux**: In a large non-stick skillet, melt 3 tablespoons of butter over medium heat. Add half of the seasoning mix and mix well. Next, add 3 tablespoons of flour and cook until bubbling.
3. **Incorporate Evaporated Milk**: Gradually whisk in the can of evaporated milk until the mixture thickens slightly.
4. **Add Heavy Cream**: Mix in the heavy cream and the rest of the seasoning, letting the sauce thicken.
5. **Melt Cheese**: Slowly add half of the cheese, whisking until melted before introducing more.
6. **Mix Pasta and Sauce**: Combine the cooked pasta, ensuring each noodle is enveloped in the creamy sauce.
7. **Layer the Mac and Cheese**: In an oven-safe casserole, layer half of the mac and cheese, followed by half of the remaining cheese. Repeat with the rest of the mac and cheese and finish with the additional cheese on top.
8. **Bake**: Preheat the oven to 350°F and bake for 25-30 minutes until the top is melted and bubbly.
9. **Broil**: For a crispy crust, broil for another 2 minutes.
10. **Serve**: If desired, garnish with sliced chives, scoop, and savor!
## Who is Tini?
Tini is a skillful cook and TikTok influencer boasting over 5.5 million followers. She gained fame for her creative recipes, including this trending mac and cheese.
## Tips and Tricks for Ideal Mac and Cheese
– **Grate Your Own Cheese**: Steer clear of pre-shredded cheese, as it often has additives that can make the sauce grainy.
– **Layering**: Similar to lasagna, layering mac and cheese creates pockets of melted cheese and a crispy top.
– **Seasoning**: Don’t overlook garlic powder, smoked paprika, and mustard; they add complexity and boost the flavor.
## Make Ahead Mac and Cheese
You can prepare this dish beforehand. Assemble the mac and cheese up to the baking point, wrap it securely, and refrigerate for up to three days. When ready to bake, cover with foil and bake for 30 minutes, then remove the foil and continue baking until heated through.
## Alternative Pasta Shapes
While corkscrew pasta is encouraged, feel free to use any pasta shape you like, such as classic macaroni, mini penne, or rotini. The creamy sauce will make any shape irresistible.
## Conclusion
Tini’s mac and cheese is a luxurious, creamy dish that suits any event. With its blend of three cheeses and flavorful seasonings, it’s guaranteed to become a favorite in your home. Whether for a festive occasion or a cozy evening in,
Read More